A Communication Tool
For Portrait Lighting
The Ambiguity of Labels
Every vocation develops "terms of art" to describe in short-hand fashion a more complex but commonly understood principles and procedures. In lighting there are classic lighting patterns which are described with names like as "short", "broad", "butterfly", "loop", "Rembrandt", etc. The problem with referring to lighting patterns that way is that: 1) a beginner will not have a clue what the underlying cause and effect which creates them is, or how to execute them; 2) more experienced photographer may disagree about exactly what set of lighting variables the term refers to, and; 3) there are many commonly used lighting configurations for which have no universally understood label.
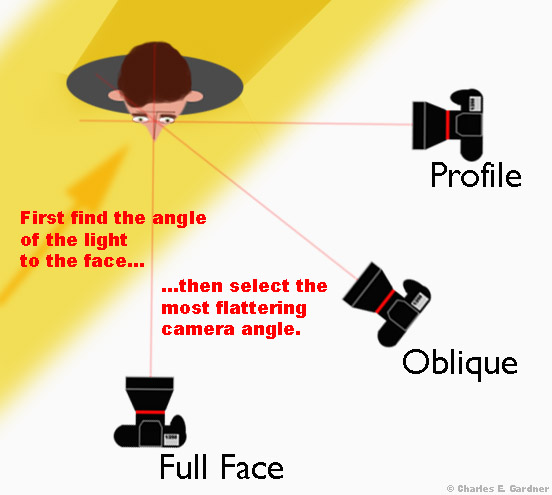
Where my tutorials differ from most lighting texts is that I don't believe learning lighting patterns by rote in "playbook" fashion is the a good way to understand the cause and effect of lighting a face in a flattering way, or less than flattering way when intended the message of the photo requires it. If you choose to read these tutorials I don't want you to get hung up on labels for lighting patterns. I start with the premise that lighting a face in a flattering way is very simple:- Put light in both eyes and the mouth: a function of key light position relative to the face
- "Hide" the nose by making it non-distracting: a function of key light position and fill
- Find the most flattering camera angle.
Where Do I Put The Key Light?
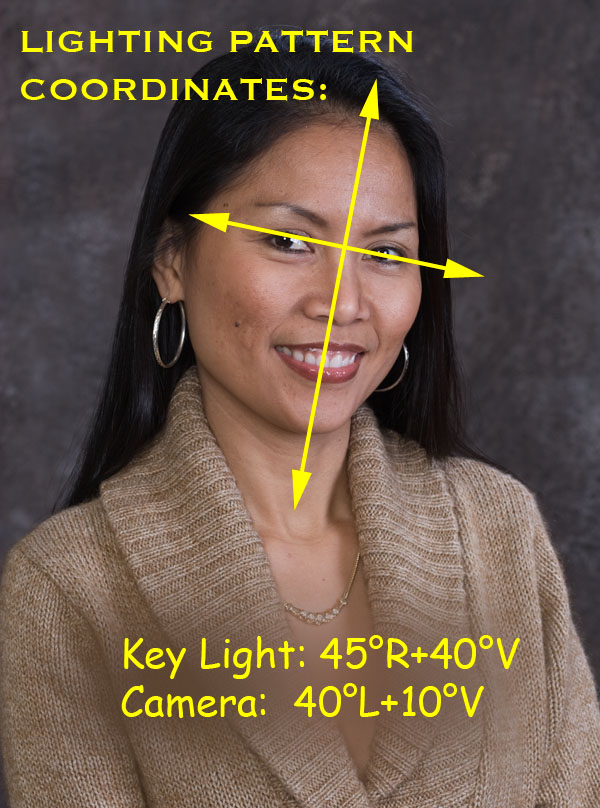
The traditional practice of using the lens axis as the baseline for key light placement and diagrams showing where lights are placed on the floor does not describe the actual cause and effect of how lighting patterns are created on a face, which is a function of the position of the key light in space relative to the eyes and nose, not there the light stand is placed on the floor. Something which many beginners don't grasp immediately from rote memorization of patterns or diagram of light placement on the floor is that when a person under the lights moves their face the pattern will change and the key light must move in space in the same way relative to the nose, as if attached to the bridge of the nose with an invisible rod to keep the pattern of light on the face the came. If we find a flattering position for the key light 45° to the right of the center line of the nose and 40° higher than the eye line with the face at eye level, but then decide to raise the camera and have the person look up at it (a trick which tightens up loose necks) from the target between the eyes moves and the key light must move with the face and stay at 45°R40°V from the bridge of the nose to maintain the same flattering pattern.
I break with tradition and use the spot between the eyes, not the camera axis as the "Compass Rose" for describing key light placement and two coordinates relative to it - horizontal angle, vertical angle and to describe where to position the key light relative to the face in a clear and unambiguous way a beginner can follow as a baseline blueprint. I use a second set of coordinates relative to the center line of the nose - wherever it is pointing - and eye line to precisely describe where the camera position should be.Where Do I Put The Camera?
Part of the ambiguity and confusion of trying to teach or learn lighting using the traditional named patterns as a model to emulate is that some, like "butterfly", "loop", or "split" describe the placement of the key light and nose shadow relative to the face which apply to any point of view or facial angle , while others like "short" and "broad" or "Rembrandt" imply a specific point of view for the camera. To eliminate that ambiguity I use a second set of angle coordinates, relative to the bride of the nose to describe where the camera is relative to the face. I think that is useful because one thing beginners tend to do is not notice details such as nostrils, which are hidden from view with the simple expedient of keeping the camera about 10° above the eye line, looking down at the top of the nostrils instead of up into them.
L: 45°R40°V C: 45°L10°V
The "LightSpace" notation above is the blueprint for creating what is traditionally called a "Short" lighting pattern. If you had never done lighting with artificial lights and showed you a photo of a person in a "short" lighting pattern you wouldn't have a clue where to put the key light or the camera because you hadn't deciphered the meaning of "short" into the cause and effect action needed to create it. But if I handed you that L: 45°R40°V C: 45°L10°V recipe you'd know exactly where light and camera needed to be relative to the face: key light placed 45°to the right of the nose and 40° above the eye line, with the camera placed 45° to the left of the nose and 10° higher than the eye line.
The Nose as the Compass Rose
for Key Light and Camera Placement
My conceptual model for key light placement is visualizing the key light as being tethered on the end of an invisible rod attached to the bridge of the nose between the eyes, the target for the light and origin of the distracting nose shadow. That between the eyes point is the center of my lighting "compass rose" - ground zero. This differs from the convention used in lighting books of measuring light position relative to camera axis but about 6 years ago when I started trying to teach others lighting in terms of cause and effect it occurred me that approach makes more sense and is more precise.
If a key light, attached to the bridge of the nose an invisible rod moves in space in an arc around the nose the effect of that movement is easily seen in the two most important areas on the face: the eye sockets and the nose shadow. There are not very many positions where the key light can be placed and get light in both eyes and cause the nose shadow to fall in a way which is not distracting. There are no hard and fast rules for key light placement and some degree of variation is needed because the geometry of faces are different, but if it gets too high the brows will shade the eyes. If it gets beyond 45 degrees on either side of the nose the light in the eye on the opposite side will be lost. If it appears to light one half of the front of the face more than another the brighter side will usually seem larger than the shaded side.
I've been teaching lighting from the "nose as the compass rose" baseline for several years and I find, based on feedback from readers, it helps beginners understand the cause and effect of relationship between the independent variables of angle of face to camera and light to face. It was something I grasped intuitively and took for granted when learning from Zucker years ago because he lit his formals via window light. You can't move a the light source so you learn to first align the face to the light to get in into both eyes and have the nose shadow fall along its base and over the top of the nostril. Once the face is oriented to the light in a flattering pattern illuminating the eyes, mouth and front of the face it is possible to make the face look different by changing the position of the camera relative to the face.
The Nose as the Compass Rose
for Key Light and Camera Placement
My conceptual model for key light placement is visualizing the key light as being tethered on the end of an invisible rod attached to the bridge of the nose between the eyes, the target for the light and origin of the distracting nose shadow. That between the eyes point is the center of my lighting "compass rose" - ground zero. This differs from the convention used in lighting books of measuring light position relative to camera axis but about 6 years ago when I started trying to teach others lighting in terms of cause and effect it occurred me that approach makes more sense and is more precise.
A More Precise Mathematical Model
In the last century color scientists developed a mathematical model for color space defined by the way the cones of the eye sense light in terms of relative green/magenta and blue/yellow hues, and the mono-chromatic rods sense levels of brightness. That model called CIE-Lab uses three coordinates to describe where any unique color we can see fits into the overall range. After a discussion of what to call the pattern on an oblique lit face viewed from the front it occurred to me that a similar mathematical model to describe light and camera position might be less confusing and ambiguous than the century old labels used for patterns. So I've developed the following form of notation: K45R+40V / C40L+10V That example creates a blueprint for a key light placed 45° to the right of the nose and 40° above the eye-line, with the camera viewing it from 45° to the left of the nose and 10° above the eye line.
The use of quantitative coordinates instead of ambiguous terms ties in directly with my goal oriented approach. Goals need quantitative, measurable criteria to gauge success. I'm not talking slide rule and protractor, just "organic" perceptual awareness of the message putting light in both eyes sends vs a portrait where one eye and almost half the face is hidden in shadow. Yes, patterns like "loop" are conventions, but if you stop and consider the fact that the perception of the shape of the nose is formed in part by the shape and size of the shadow it casts, you might come to the conclusion, as I have, that hanging a dark looping shadow off to the side of the nose and over the upper lip isn't really the most flattering, non-distracting way to light the nose or the face.
The Face is a Moving Target
The origin or "Ground Zero" for LightSpace is the spot between the eyes, with all angles measured FROM that spot to the key light and camera. This may seem confusing if you are accustomed to thinking of placement relative to the camera axis but like most things I do its based on common sense. Once you get a flattering lighting pattern on the face, if the face moves the light must move the same way. So must the camera if the same flattering angle is desired. With so much moving of face, light and camera what beginners and many experienced shooter don't realize is that the angle of nose to light and nose to camera winds up being the same.
If the face moves the key light must move with it to maintain the pattern, but the angle of light to face remains constant.
Fill - The Constant Factor and Silent Partner
The Achilles Heel of all forms of color photograph is that film and digital sensors can't record the full range of many ambient-lit scenes. We are all familiar with what happen if a person is standing facing the sun: if the sunlit parts are exposed correctly the eyes shaded by the brows become dark voids.
Outdoors there is one light source, the sun, but light comes from two directions: the direction of the sun, and from all directions reflected off the sky. My approach of keeping the fill source centered over the camera is modeled after the way the natural fill from the sky wraps around everything we see and from a very basic fact of photographic life: any place the fill source is shaded there will be no detail. The "key" light position relative to the face, described but by its LightSpace coordinates, create the illusion of 3D in the photo. The role of fill is simply to overcome the technical shortcoming of the medium and lift the shadows to the point where the sensor can record detail. In my Four Light Exercise I well show how fit the range of an indoor scene to the sensor with a foundation of even, centered "neutral" fill to lift the shadows to where the sensor can record detail, then overlap a directional key light source to create the highlight pattern over it which creates the illusion of 3D in the photo. In my Outdoor Lighting tutorial I explain why supplemental flash is needed and the most effective strategy to fit scene-to-sensor. In my Metering and Ratios Demystified tutorial explain how even neutral fill is treated as the constant factor in the portrait lighting ratio convention of 2:1, 3:1, 4:1 etc.The Role of Blueprints on the Learning Curve
Aspiring chefs learn basic skills such as how to sharpen a knife and use it without cutting off their fingers at the start of the learning curve and then progress to learning culinary classics such as basic sauces. Every step along the way there is a master chef who provides a blueprint of recipes and techniques to follow. The exercises are designed in part to show reveal the ingredients and which work well together to produce a pleasing net result. At some point the aspiring chef will begin to paint outside the lines on the blueprint, but by then they will have a the baseline of experience to know whether or not the experiment was a success. Eventually everyone gets to a point on the learning curve where reactions and decisions occur sub-consciously and the successes outnumber the failures.
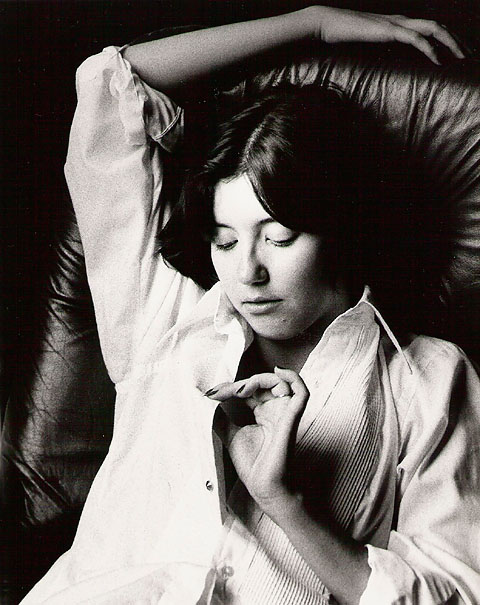
I learned lighting the old fashioned way, taking an apprentice level job at age 2O with Master Photographer Monte Zucker. He taught in person and had a cook book like approach with a recipe to cover almost every portrait and candid shooting situation: get light in the eyes, find the most flattering angle, and get a good expression by interacting with the subject instead of obsessing on the technical stuff. The key to not needing to worry about the technical stuff was mastering the basic recipes and not loosing sight of the broader goal of the exercise: to make people look and feel good. The organic approach to lighting I learned from him was to first look at the face profile-to-profile and evaluate the shape of the head and whether or not when viewed full face it looks slim and symmetrical. That reveals immediately whether or not a person will look their most flattering full face. If the face isn't symmetrical my training at the feet of a master and experience in the 35 years since tells me one of the two oblique angles will make the face look more attractive. It's not calculus, just very playing very simple odds. Odds are 90% of faces will look more attractive from an oblique than full face. Once the most flattering angle is determined the question becomes one of which horizontal/vertical position of the key light in space relative to the bridge of the nose will put light in both eyes, create a non-distracting nose shadow, and model the face in a natural way so it look slender and symmetrical, even if it isn't naturally. When all those criteria are considered there really are not many key light positions which can do that. This is a portrait I took in 1979 with natural light on the balcony of my apartment.

What Are the Names of Those Patterns?
Old habits being what they are I use the conventional terms "short", "broad", "butterfly" in my tutorials. I can see how that can cause confusion because they are not very specific and really don't describe the cause and effect of light placement and facial angle very precisely. So henceforth I plan on using angular coordinates for describing where the key light is relative the face for a given pattern.
- Short Lighting:
- Where I mention "short" lighting I refer to key light placement of approximately 45°H / +40-45°V which creates a mask of highlights on the front if the face, irrespective of the camera angle which might be full, oblique, or profile. Short lighting conventionally refers only to oblique or profile view, but there is no conventional term for a full face 45H / +40V pattern which is the same position of light relative to the face. Most effective for contrasting the front of the face on dark backgrounds.
- Broad Lighting:
- Where I mention "broad" lighting I refer to key light placement at greater than 45°H from the center of the nose which creates a situation where one half of the face is shaded. Conventionally this is used to refer to an oblique facial angle pose where the side facing the camera is highlighted and the far side is in shadow. Most effective for contrasting the front of the face on light backgrounds, or making very thin faces look wider on dark ones.
- Split Lighting:
- Where I mention "split" lighting I refer to a full face view where the face appear to be cut in half down the middle of nose. It is similar to "broad" lighting in that it puts half the face in shadow but specific to the full face camera angle. I don't consider this pattern flattering for general portraiture because the shaded side of the face and eye do not facilitate a connection with the subject. Best used as a metaphor for a hidden dark nature / split personality.
- Butterfly / Centered Lighting:
- Where I mention "butterfly" lighting I refer to a full face view where the key light is placed at 0°H / +45-60°V centered on the nose with the shadow falling directly below the nostrils above the lip. A symmetrical pattern which complements a full face view when the face is naturally thin and symmetrical.
- Loop Lighting:
- Where I mention "loop" lighting I refer to a key light is placed at 5-15°H / > +45°V which causes the nose shadow to fall down and to the side over the upper lip. I don't consider this pattern flattering because the shadow distracts and distorts the appearance of the nose.
- Rembrandt Lighting:
- Where I mention "Rembrandt" lighting I refer to a key light is placed at 50-60°H / +45°V which causes the all but a very small patch of highlight and the glint of a catchlight to appear on the shaded side of the face, mimicking Rembrandt's self portrait. I don't consider this pattern flattering for general portraiture because the shaded side of the face and eye do not facilitate a connection with the subject.
Holistic Concepts for Lighting
and Digital Photography
This tutorial is copyrighted by © Charles E. Gardner.
It may be reproduced for personal use, and referenced by link, but please to not copy and post it to your site.
You can contact me at: Chuck Gardner
For other tutorials see the Tutorial Table of Contents