and its not what I see
in the mirror

Back in 1972 when I was 20 years-old and itching to be a professional photographer I had the good fortune to apprentice with Monte Zucker, renowned wedding and portrait photographer whose trademark style was shooting formal portraits using nothing but window light and using a pair of strobes for candid photos. Two years of shooting weddings convinced me professional photography wasn't the path to riches and early retirement and my career took me a different direction. My job in the Foreign Service meant packing up and moving every few years and never having the space for a studio or the real need for studio lights I continued to use the lessons learned from Monte shooting by natural window light whenever a portrait was needed and using a pair of Vivitar flashes for everything else.
In 2003 I finally had space for a studio and was toying with idea of photography as a post-retirement business. So with that vague notion in mind I purchased a set of four studio lights and an assortment of modifiers. Softboxes create soft but directional light which models the face similarly to a window so its was just a matter of learning how to use a slightly better set of tools which afforded precise control and operated on my schedule instead of the sun's. This self portrait was the result of my first session with my new lights.
It's been retouched to remove the catchlight from the fill light and about 10 years worth of wrinkles. It's not a textbook
perfect oblique pose because the ear shows past the far eye, but then I don't have a textbook perfect symmetrical face either as you will see below.
This photo isn't a textbook perfect oblique pose, but it illustrates what I came to realize about rules and terms for precise facial angles like 2/3 or 3/4 you see in most books on lighting. Forget about fractions and use your eyes to find the best visual balance! There are no rules or playbook solutions which apply in all situations. You need to start with a goal, flattering the person and evoking some emotional response in the mind of the viewer, then work the problem.
Look at your subject's face from profile-to-profile and let your eyes and brain tell you which is the most flattering angle. Most people don't look their best in a full face view because their heads are large or asymmetrical. So odds are a right- or left-facing oblique view will be more flattering. Combine it with a short lighting pattern on the dark background and even the widest most lopsided face can be made to look slimmer and more symmetrical. That's really what the craft of portraiture is about, making people look better in a photo than the flat-lit full face view they see every morning in the bathroom mirror.
There is no rule, magic formula or fraction which dictates how to set up an oblique view. I start by framing the photo so the far eye and cheekbone profiled then look at the appearance of the area of the chin beyond the mouth. If as in my case if the person has a thin weak chin its necessary to strike a visual balance between the appearance of the eye area and the chin line. In my case it required some of the side of the head visible beyond the far eye and the ear on the right to show. That ear sticks out sideways, so much so that in this photo it actually ends up appearing more balanced and symmetrical relative to the one photo left than in a full face view.
Try this Photoshop mirror exercise with your own or other familiar faces and you may notice asymmetries for the first time. An odd quirk of human perception is that we perceive what we expect to see and usually don't look as critically at familiar faces as those of strangers we are meeting for the first time.
I took a full face shot of myself, intentionally making it "snapshot" / "mugshot" quality.

Next I took it into Photoshop, split it down the middle and mirrored it to get symmetrical right and left side renditions; what I'd look like if my face was symmetrical depending on which way the creator tossed the dice:
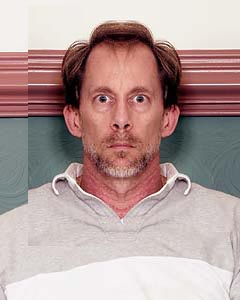
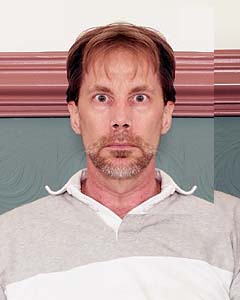
It doesn't take a rocket scientist to figure out which is my best side does it? I'd been looking at that face in the mirror for 50 years and knew it looked asymmetrical but didn't really think about how to fix it in a photo until doing
this little experiment. Like you, after seeing the two photos I had a clue what to do and look for when analyzing other faces.
Now look at that portrait above again. Anybody can take a great looking photo of a great looking face, but look what I had to work with! It wasn't an accident or lots of trial and error that resulted in the fact I am facing to the right, or that I was three feet below the camera and 10ft, away using a 200mm lens to get the most flattering angle and perspective.
Which did you learn more about facial analysis from? My nice studio shot or those horrible photos with the written
explanation? Now do you understand why I don't do pictorial "playbook" tutorials? I don't want you to copy photos I want you to grasp concepts so you can figure out how to handle any situation that comes your way in a portrait or any other type of photo.
Holistic Concepts for Lighting
and Digital Photography
This tutorial is copyrighted by © Charles E. Gardner. It may be reproduced for personal use, and referenced by link, but please to not copy and post it to your site.
You can contact me at: Chuck Gardner
For other tutorials see the Tutorial Table of Contents