Zeltsman / Zucker
"Feet-Up" Method
I was Monte Zucker's full time assistant for a couple years back in the early 1970s and learned the Zeltsman / Zucker approach to posing. At that time Monte was one of the best known wedding photographers in the world and a very popular lecturer and teacher. Joe Zeltman, a portrait special was his mentor and the person who developed the very simple approach to posing Monte used. Zeltsman's tutorial on posing and lighting can be found on line and is a must read for any portrait photographer. Even if you don't like the classic style or the very dated illustrations you should find his approach to posing both very ingenious and enlightening.
Zeltsman's genius was realizing that all poses must start with the feet on the ground and that how they are placed and weight shifted between them will cause just about everything above the ankles except the head to automatically fall into the desired pose.Once you grasp that "feet up" concept it becomes much easier to duplicate a pose you see and think is effective. If you position the feet and shift the weight on them the same way you get the same results. The easiest way to learn how to pose someone is to stand in front mirror and try to put yourself in the same pose. That way you can connect how the pose looks with how it feels. Knowing how it feels will help you communicate to the subject how to execute the pose.
For example, a large group can be posed in about 30 sec. by splitting the group down the center and telling both sides to face the center, with their heels close together front foot pointing directly at the camera. The next step is the magic one. Tell everyone to shift their weight to the back foot and lift the heal off front one slightly of the ground. That shifts the weight to the back foot which angles the shoulders and heads towards the center. The combination of the flattering posture and inward tilt makes the group look cohesive.
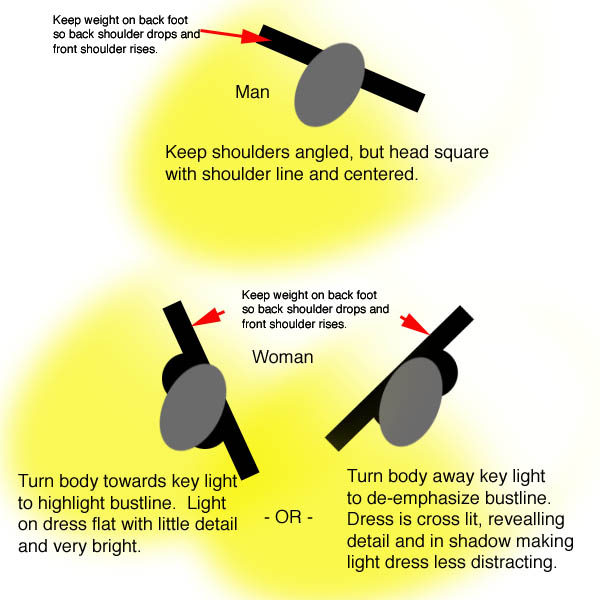
Posing seems to challenge most people, but it is really nothing more than a re-engineering of the body language we all react to every day of our lives. So understand posing you just need to stop, pay attention to what you see and think about why you react a certain way when you see a pose in a photo. That's what Zeltsman did to come up with the basic characteristics of a masculine and feminine postures. Turning the body and face square to the camera is confrontational; a masculine trait. Turning it sideways is submissive, a feminine trait. Leaning into the camera is aggressive and leaning away is submissive which will also be interpreted as being masculine or feminine. Any pose can be built on those two conceptual foundations.
There are many more variations on posing than you will find in Zeltsman's tutorial because he specialized in formal portraiture. But his method of analyzing and breaking down the mechanics a pose into foot positions, weight distributions, and angles of key body planes such as the hips, shoulders and eye line can be applied to any pose to reverse engineer it an create a verbal blueprint you can use to instruct your subjects.
For example you can take the basic feminine posture defined by Zeltsman - weight on back foot with head turned and tipped to the near, higher shoulder -- and change the look from stately and demure to drop dead sexy by simply making the tilt of the hips, shoulders and head greater and separating the legs and arms from the body to create an eye catching gaps. A pose will look more stereotypically masculine if the head is kept squared off and centered with the shoulder line - eye and shoulder line at the same angle - with the body in a more square to the camera, forward leaning aggressive posture.
Monte was an absolute genius in his ability to look at a face and quickly determine what would be the most flattering angle. It is not really difficult, you just need to stop and look at the subject's face from profile-to-profile and pay particular attention to full face -- which reveals any asymmetry -- and both oblique angles where the far side of the head disappears and the face becomes slimmer looking. If the face is asymmetrical one oblique view - the narrower side - will be more attractive and flattering than the other with short lighting. So before the subject even sets foot in the studio you can know which direction they should face and which side the key light needs to be on. While they do their final touch-up you set and meter the lights and start capturing their most flattering angle immediately. Once that's in the can you can try everything else and see if your initial evaluation was in fact the best. The more you do that the better you get at evaluating.
Because all faces are different it is very important not to fixate on specific rules or formulas for posing such as a precise 2/3 view which profiles the eye socket. Monte tended to fall into that rule / formula trap when teaching because it is simpler for students to grasp. I take a different approach in my tutorials. I stress goals, strategies and tactics.
The goal in a portrait is to make the face look attractive. The core strategy to accomplish that goal is to make the face appear as perfectly symmetrical and slim as possible.Have you every noticed that most top models and actors have faces with those characteristics? They also nearly always have noses which have drooping tips which naturally hide the nostrils when the face is viewed at eye level. A slim symmetrical face without the nose holes showing is deemed attractive in nearly any culture. Tests showing people photos and having them score them have proven that fact.
The most effective tactics for posing and lighting make a person look attractive by making their face appear slim and symmetrical. That is relatively easy on a dark background because what the viewer will see can be controlled by where the highlights are placed and how dark the shadows are. It is far more difficult to do on a white background because the tonal balance is reversed - the darkest things attract the most attention - and because color contrast plays a greater role than tone in defining what is most important.
Since Zeltsman worked almost exclusively on dark backgrounds his tutorial does not address the different strategies and tactics that dark and white background require. To the extent I am able to add to the foundation he built it was my realization that key factor for visual effectiveness isn't the lighting, but rather how the lighting causes the front of the face to contrast more strongly with the background than anything else in the photo. On a dark background the front of the face in a portrait needs to be the brightest area and on a light one the front of the face in a portrait is most compelling when it is evenly lit to make it warm, saturated and slightly darker than any other skin tone in the photo.
If you shift your thinking and learning process from one of following a set of rules by rote to understanding the cause and effect of lighting, posing, clothing and composition you will find yourself able to understanding and solve any now lighting problem you are confronted with. Just define a goal, devise one of more strategies and the necessary tools and tactics needed will become obvious.
Holistic Concepts for Lighting
and Digital Photography
This tutorial is copyrighted by © Charles E. Gardner.
It may be reproduced for personal use, and referenced by link, but please to not copy and post it to your site.
You can contact me at: Chuck Gardner
For other tutorials see the Tutorial Table of Contents