Lighting Choices
From the time I could talk I was one of those kids who drive adults nuts by constantly asking "Why?" when told to do anything. As I grew when confronted with any conventional wisdom regarding how to do something I would usually try things that way, but also try to understand the cause and effect - the WHY DOES IT WORK underlying the HOW TO.
I've read hundreds of photography books over the years an all of them have been "How To ..." approaches. It was only when I started reading books on psychology and and human physiology that I began to clearly understand why conventional wisdom worked from the baseline of how humans perceive the world around them. In some cases I've found conventional wisdom not necessarily wrong, but less effective at meeting goal of a flattering portrait than other less conventional approaches might be.
Human perception is a constant process of comparison of what we see with assumptions of how it should look. Why do we recognize a face in a photographic portrait? Because we we have memories of seeing faces and recognize the shape of the face based on the illusion of 3D shape the lighting creates. But when seeing a face in a photo the primary clues are seeing the eyes and mouth clearly or not, because that is where humans instinctively look to when meeting a stranger to gauge their mood and intent.
Hard and Soft Light
Conventional wisdom about lighting is filled with references to "hard" and "soft" light. But what do those terms really identify? The characteristics of the source? The perception of the object illuminated?
Source? Light is neither "hard" or "soft". Those are traits of real objects determined in person by the sense of touch. What light sources are, more accurately, collimated (emitting parallel rays) or non-collimated (emitting light at a variety of angles from the source). In most photographic situations there is third factor lifting the tone of the shadows: spill fill.
For example this shot was taken with a pair of speedlights with 8" diameter DIY reflection diffusers I designed to bounce most of the light from each flash forwards for efficiency and control
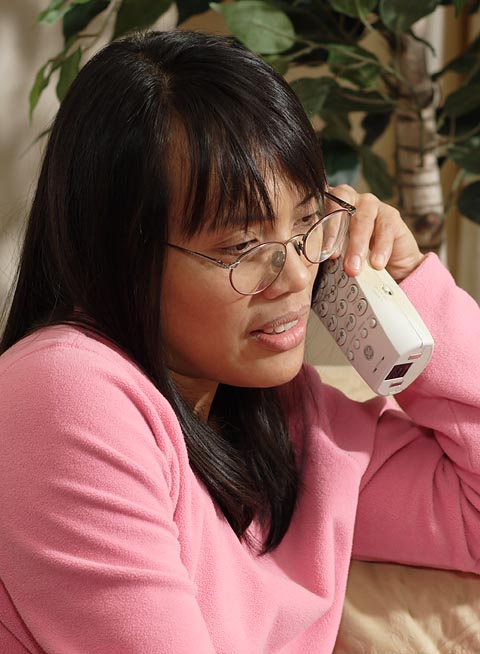
But in this wide angle shot you can see there is also a large amount of "spill fill" contributing diffuse, omni-directional fill.
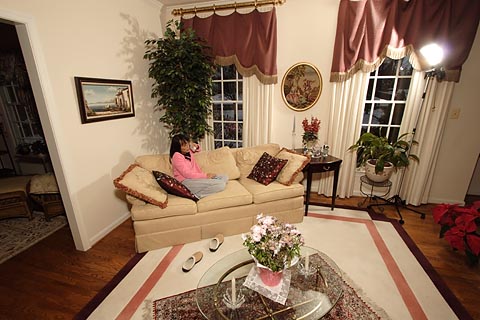
What the ceiling and wall do indoors to contribute wrap-around fill is similar to the cause and effect of skylight in outdoor lighting.
In this backlit shot with flash added in front most would say I used "fill" flash...

But in terms of the actual cause and effect the "fill" in that shot came from the skylight, not the flash. Fill lifts the shadow and in that shot I had raised the flash on a bracket to model the face at the same downward "key" light angle as natural light creates 3D modeling on a face. The flash became the frontal "key" overlapping the natural light already modeling the face at the same angle. The "fill" comes from the wrap-around component bouncing off the "ceiling" of the earth's atmosphere. That's easier to see in this blurred copy:

What lighting angles and ratios do in a photo is to create contrast differences on 3D objects which cause the brain of the viewer to associate the 2D contrast pattern with the memory of a 3D object. The lighting in the two examples is not what I consider "hard" or "soft" but rather what falls between those two impressions based on the brain's interpretation of the lighting clues – "NORMAL". When we react to lighting as being "hard" or "soft" what we reacting to are clues that tell us the face isn't in the angle and contrast we normally see faces in person most of the time in outdoor and indoor lighting.
Something which might never occur to you is the fact that all human perception is driven by what we expect to see. What we expect to see is driven by how we see things most of the time. For example our baseline for what a face normally looks like is how they look outdoors. From 10AM to about 2PM the light from the sky hits things at about a 45° downward angle so that becomes a perceptual baseline for "normal". But as the sun sets its angle gets lower. The shape of the face it is illuminating doesn't change but the light rays hit it from a lower angle and there is less bounced fill from the sky. Comparing the two anyone who had ever read a photography book or conventional tutorial if asked about the character of the two lighting conditions would say the afternoon light was "harder" that that in the afternoon.
But ask the observer to describe the actual 3D shape of a face seen at both times of day and the descriptions would be identical. Why? Because interpretation of the shape of the face would be make from memory based on seeing faces in person with binocular stereo vision and depth perception and from feeling the shape with their hands. The difference in the lighting clues really doesn't change the perception of the object it is illuminating it simply identifies the environment the object is in: mid-day vs. late afternoon sun.
We all know what a face looks like regardless of the light it is in. So what lighting described in terms of the conventional usage of "hard" and "soft" is actually conveying is THE ENVIRONMENT THE OBJECT IS IN.
Natural vs. Artificial Appearance in Lighting
To the extent natural light looks "hard" in photographs it is because the means of recording the scene can't handle the contrast of the lighting. When exposed for the accurate highlights the mid tones face will be rendered abnormally dark (compared to seeing it in person) and shadow detail which is perceived by eye because the pupil of the eye is constantly adapting will be missing in the photo. What photographers learned to do to overcome the short range of color film and digital sensors was to exposed to render the highlights on the front the face accurately both when the face is in direct sun or in shaded in backlight, accepting the loss of shadow detail which occur in direct sun and the blown background highlights which occur when exposure is biased for the shaded face. However neither result is "natural" in the sense of being able to reproduce in a photo what was perceived by eye.
The point to grasp in the paragraph above is the fact that the limitations of photographic process will, in most cases, record outdoor scenes as looking much "harder" perceptually than we experience them in person. A face seen in direct sunlight isn't typically perceived as being in "hard" light, but rather in "normal" light. It's only the fact the camera renders the shaded eye sockets much darker than we notice in person which makes the lighting see "hard" in the photograph. When a face is shot on an overcast day or in open shade in which the contrast of the lighting is within the range the camera sensor can handle the eye sockets will not be as dark when the cheeks are exposed correctly and the rendering will be perceived as being more "normal" because the rendering in the photo matches the in person perception of what the face looked like. Part of the reason You are not as likely to notice the eyes are shaded in person goes back to the fact that in-person impressions are the result of knowing what the face looks like from the other senses and seeing it from a variety of angles.
A few years ago when our out of town guests arrived after a day of sightseeing I grabbed my camera and speedlights and shot the photo of the boy below. Then I decided to switch to my studio lights for shooting the girl and some group shots.
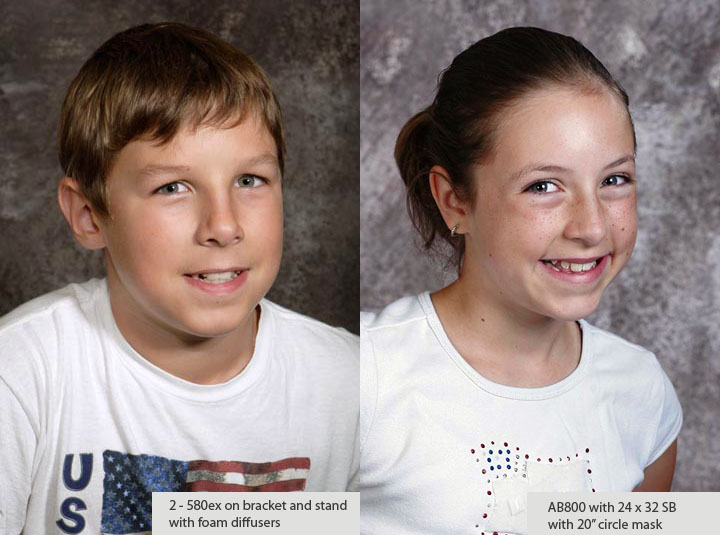 If you look critically at the highlights and shadows in both you will note the shadows on the girl are a bit lighter in tone, but overall the lighting seems "harder" than on the boy with darker shadows on his face. The difference and impression of "hard" vs. "soft" in that comparison is due to the perceptual reaction to character of the highlights defining the highest points on the 3D shape of the faces. The boy had washed his face on arriving, but the girl wearing make-up didn't. So while conventional wisdom would say the bigger light source for the girl (20" vs, 8" on the boy) should produce "softer" light, the variable of what the light is hitting has a greater impact on how the light reflecting off the surface makes the surface appear. It's not the light that is hard or soft it is the surface texture and how it directly reflects (girl) or scatters the light (boy) which create reaction and impression of "hard" vs. "soft".
The solution in normal studio portrait session would be to have the subject wash their face or not wear make-up that created specular reflections on the skin. But shiny skin is unavoidable in candid shots. Here's another example. This is one of over 300 head shots I did for my church membership database by grabbing them as they arrived for services, putting them in front of a wall and shooting with two speedlights with the same set-up as the boy above...
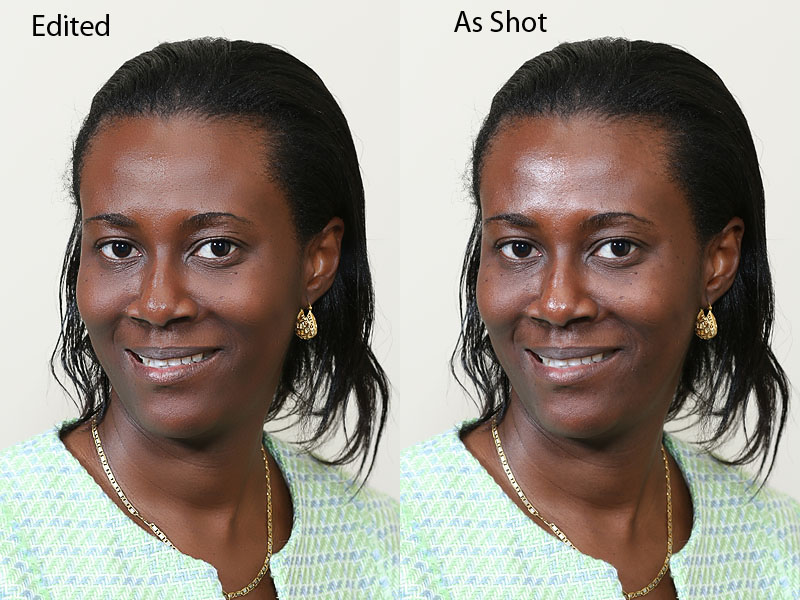
On the left is how the shot looked out of camera. On the right is the edited version in which I used cloning in darken mode to tone down the specular glare on the skin and then applied smoothing. That post-processing has the net effect of making the overall appearance seem "softer" by toning down the sharply defined highlights and lowering the overall contrast gradient from open shadows to highlight.
Outdoors there is a very simple baseline for "normal". There is one source, the sun, both two directional components: the collimated rays of direct and the non-collimated wrap-around fill provided by sunlight reflecting off the sky opposite the sun. Both hit objects from above an an average angle of 45°.
Indoors the ambient light can come from a variety of different directions from windows and artificial sources. In person our eyes adapt to differences in brightness and color temperatures in ways a camera can't. What winds up looking "normal" in an indoor shot will depend on the context provided by the content of the photograph. For example, below is a shot as captured by the camera...

Here it is after editing with blended layers to make it closer to how I perceived it by eye in person

In the edit I balanced the exposures of windows and artificial light sources biased the sun room on the right cooler than the interior tungsten illuminated.
Faking It to Make it Look Real in the Photo
The interior shot above is a case of what I call "faking it to make it look real". Real in that context is what was perceived in person as "normal" by eye when taking the shot. Getting there is a process of taking a shot with the ambient light, seeing how what the camera records compares with the eyeball version, then developing a strategy for making the camera version as similar to it as possible in the photo and mind of the viewer when they look at it. In the "good old days" it was a process of camera exposure, film development and techniques like dodging and burning when making a print. Nowadays it is more a process of exposing for the highlight detail, adding flash to alter the foreground to fit its range to the camera's, then manipulating what the camera captures in Photoshop. The tools have changed but the goal remains the same: make the photo seem like the real thing in the mind of the viewer.
When flash is used outdoors the technical goal is to overcome the contrast of the natural lighting which makes an ambient only shot look fake, relative to how the same scene was perceived by eye. In conventional terms the "hard" natural lighting of the direct sun is made to look "softer". In terms of cause and effect the use of flash matches the contrast of the foreground to the background by lifting the shadows of the ambient without affecting the highlights created by the sunlight, something which only works if the camera shoots into the shadows of the ambient and the flash does not overlap the sunlit highlights.
Natural vs. Flattering Lighting
Natural outdoor light and most indoor light isn't very flattering because it comes from such high angle most of the time that the brow shades the eye sockets. That problem is obvious on a sunlit face because the limited contrast range of the camera range exaggerates how dark the eyes are rendered. But the same problem exists on a face in open shade. The skylight also comes from a high angle and will cause the brow to shade the eyes. Indoors the dark eye problem is even worse because the light sources tend to be more directly overhead. So of the three situations if you shot with the natural light with a normal subject orientation you will wind up with a portrait in which the eyes look darker than the highlighted parts of the face.
Outdoors the light source can't be moved so the solution is to move the face to the light by raising the chin. Looking directly into the sun isn't practical, so its better to shoot facing into the sun (using it as rim light), raise the face and eyes into the skylight as even fill, then add flash over the top of the sky fill to create the lighting pattern on the face. The net result winds up more flattering than natural light alone because the eyes are not dark and the face has more effective 3D modeling via the highlights the flash adds.
Indoors because the light level is lower it is easy to overpower the ambient with flash. In most situations that is desirable to avoid mixed color temps between flash and ambient. Raising a single flash on a bracket by 12-18" gives the light a natural downward angle, but not so high the brow shades the eyes as in natural light. Even better is using dual flash with the one on the bracket creating fill like the sky and the off camera flash overlapping to create a highlight pattern on top of the fill.
A Soft Look from Hard Light
Collimated sources like direct flash which are conventionally thought of as "hard"light sources can produce flattering, soft looking lighting on faces. The formula is simple: start with a foundation of flat fill light to raise the shadows, then overall the key light source from a direction which accurately models the actual 3D shape of the face: 45° from the nose and 30-45° above the eye line to get it in both eyes and create a "mask" pattern of highlights on the front of the face. The overall perception of "soft" will be due to lighting ratio. If the shadows are kept uniformly light there will not be a large contrast range between highlight and shadows and all the gradients on the face will be gentle giving it a more rounded smooth appearance. If the same pattern is maintained but the fill is reduced the increase in contrast has an interesting perceptual effect, making the highlighted parts of the face seem smaller.
At this point the conventional wisdom and terminology about "hard" and "soft" light start to get a bit confusing. The fact the light is collimated or not (i.e., hard or soft) is not what changes the perception of the shape of the face it is the fact the parts of the face which are actually higher are highlighted and those which are lower are shaded. The size and distance of the key light modifier will affect the overall look of the lighting, but it is the tone of the shadows (controlled by the fill intensity) not the character of the key source which has the biggest impact on the perception of shape.
Knowing what is does is more important than what it is called
When confronted with a dilemma of trying to fit a conventional terms to an observed cause and effect which terms don't describe accurately my solution is to avoid using the terms entirely, removing them from my photographic lexicon to avoid confusion as to their true meaning. For example if I were to say, "you can get soft lighting on a face with two direct 'hard' flashes," you'd think I was crazy... until you tried doing it as I do overlapping the key light creating the highlights over the top of even fill which lifts the shadows and creates a front-to-back gradient in the shadows and highlights with intensity fall-off.
Once you grasp the cause and effect of how two lights in an overlapping even fill / key pattern alter the contrast range on an object, and how foreground / background contrast affects perception you will realize as I have it is the brain's interpretation of contrast clues, tonal gradients, which make objects like faces look naturally 3D, or not, in 2D photographs.
Contrast Gradients and Expectations
Lighting used to render objects in photographs will create contrast gradients on the objects which the brain will evaluate and compare to a memory baseline. The comparison with the baseline is about determining the shape of the object &emdash; memory provides that information &emdash; but rather the context and environment the object is in.
Natural daylight and indoor lighting have similar perceived contrast in which the eye can typically detect a full range of detail in both black and white objects seen together Thus when a scene is rendered with more contrast than normally seen by eye the first reaction is usually, "that's not normal" followed by a logical deduction of the reason why; the context of the environment.
For example as night falls and there is less fill from the sky the same source will produce more contrast between foreground and background. The same is true for artificial light sources which fall off rapidly with distance. Often what makes flash photograph look obviously fake aren't the clues the lighting on the subject provide but rather the light is seen to artificially fall off into darkness.
As you explore the techniques of lighting and its many tools always stop and ask the question "Why does this work". In every case if you think about your emotional reaction to the lighting strategy you will find how the contrast range overall in the photo and on the objects in the photo compares to what you perceive as "normal" contrast is which drives your interpretation of the environment the object is it. Regardless of the lighting you'll recognize the object (sooner or later), the lighting mostly tells you where it is. That in turn will trigger different emotional reactions.
When you get to the point where you can start with the emotional reaction you want to create in the mind of the viewer about the environment the subject or object is in you will instinctively understand whether to portray it with normal contrast lighting or not and the tools and techniques should be obvious.
Holistic Concepts for Lighting
and Digital Photography
This tutorial is copyrighted by © Charles E. Gardner.
It may be reproduced for personal use, and referenced by link, but please to not copy and post it to your site.
You can contact me at: Chuck Gardner
For other tutorials see the Tutorial Table of Contents