Workflow
Editing Workflow
There is no one perfect digital image workflow which will fit the needs of
everyone and in many cases an individual may want to use several,
depending on the anticipated use of the images. This tutorial explains
the various options, their advantages and disadvantages.
RAW vs JPEG?
The first decision which must be made at the time of capture is whether to
shoot in RAW or JPEG mode. In terms of technical superiority and
flexibility of making post-capture corrections RAW format, which captures
the unprocessed sensor data, is the better option. The only drawback with
RAW vs JPEG is the size of the files, but today with faster computers and
economical camera card and hard disk storage that is less of an issue.
RECOMMENDATION: Shoot RAW
Editing Application?
Both Canon and Nikon supply RAW editing applications with their cameras
which allow basic modification of exposure, contrast, sharpness and other
"global" adjustments and simple file organization. A global adjustment
is one which affects the entire image. For example brightening a face
will brighten all similar tones and may result in a loss of detail in some
lighter areas. Other basic editing application which are noteworthy are
iPhoto for Apple and Piccasa by Google which are able to open RAW files
and perform basic editing with automated "best guess" functions.
The next level of sophistication are editing applications such as Adobe
Photoshop Elements, Adobe Lightroom and Apple Aperture. They offer more
control over global editing functions and a basic level of localized
correction ability, plus better file organization methods including
Metadata and search capability.
The grand-daddy and king of editing applications is Adobe Photoshop which
originated in 1990 and is currently in its 11th version, CS4. It works in
conjunction with an organizer application named Bridge and a RAW editor
called Adobe Camera RAW. It allows very sophisticated localized
correction and retouching of images using layers and masks and powerful
transformation functions. It is also the most expensive.
RECOMMENDATION: I've used Photoshop since version 1, but have also used
Picassa, Canon DPP, and Adobe Elements. For a person starting out in
digital I would suggest starting with the supplied Canon or Nikon software
and iPhoto or Picassa to master the basic editing steps before jumping
immediately to the next levels. For a recreational hobbyist wanting
better controls and file organization Adobe Lightroom or Aperture (Apple
only). For more sophisticated users wanting to retouch portraits and
other more sophisticated localized tasks it would be worth making the
financial leap to Photoshop. It comes in two versions, a basic and deluxe
with 3D editing functions. The basic version is sufficient for photo
editing; the more advanced is needed for graphic design work.
Editing Application?
Both Canon and Nikon supply RAW editing applications with their cameras which allow basic modification of exposure, contrast, sharpness and other "global" adjustments and simple file organization. A global adjustment is one which affects the entire image. For example brightening a face will brighten all similar tones and may result in a loss of detail in some lighter areas. Other basic editing application which are noteworthy are iPhoto for Apple and Piccasa by Google which are able to open RAW files and perform basic editing with automated "best guess" functions. The next level of sophistication are editing applications such as Adobe Photoshop Elements, Adobe Lightroom and Apple Aperture. They offer more control over global editing functions and a basic level of localized correction ability, plus better file organization methods including Metadata and search capability.
Editing Colorspace: ProPhotoRGB, AdobeRGB, sRGB?
When opening a file in a RAW editor it must be conformed to an editing color space, which is a system of numerical designation for each color value in the file. I'll assume you have read my Color Management Primer which explains the difference between the three editing gamuts. If you have not, please read it before proceeding.
The most important criteria for an editing space should be that it larger than both the three-dimensional monitor and printer gamuts: both can fit inside of the editing space:- ProPhotoRGB:
- If you could only one suitcase and it needed to meet all your vacation needs you'd want a large one. It might be too large for a quick weekend trip, but provide the room needed for a two-week vacation. ProPhotoRGB is the colorspace equivalent of the big suitcase. Technically speaking its only really necessary if you plan to print your files on a 8/C ink jet printer, but if you have a fast computer and lots of storage space it is the best choice for working space if you only want to edit the file one time. The caveat is that it is necessary to work in 16-bit mode with ProPhoto to avoid banding artifacts (i.e. visible posterization) in smooth areas like sky and skin and also store files in 16-bit mode, which requires more disk space and processing time. If you opt to use Lightroom as an editor ProPhoto is the default color space when opening the RAW files.
- AdobeRGB:
- This color space was created in 1998 to meet the needs of commercial offset printing and is now smaller than most ink jet printer gamuts making it less desirable than ProPhoto for editing files which will be printed on ink jet printers. Choosing AdobeRGB as an editing space is a big like selecting a suitcase based on what will fit into the truck of a two-seat roadster: it will be adequate for some files but not for the more demanding ones. An advantage of AdobeRGB is the ability to store edited files as high-quality 8-bit JPEGS without risk of banding, which make them easier to transmit to printing labs via the Internet. Labs serving professional photographers such as WHCC recommend JPG level 10 for file transmission. The recommendation is based on the fact it is difficult to see any difference in final print quality between 8 and 16 bit files in smaller sizes at normal viewing distances.
- sRGB:
- This is the default standard for the Internet because it is similar to the gamut of most consumer monitors and photo-based printer at Costco and other similar processing facilities. Regardless of which editing space is used, if an image is intended for display on a computer at some point a separate copy most be converted to sRGB so it will look the same on all computers, but the only compelling reason for editing in sRGB would be to eliminate one extra editing step, the conversion from a wider editing gamut (i.e., ProPhoto or AdobeRGB).
File Bit Level:
The files created by the editing application will have 8, 16 or 32 bits used to describe the unique levels of each color. In binary a one-bit file would have two possible tones per color, white (0) or black. An 8 bit-per-color file has 256 different tonal gradations in each color or 256x256x256 = 16.7 million discrete colors. A 16-bit file has 4048x4048x4048= million discrete colors. Increasing the bit level of a file makee the transition between colors more gradual. With low bit levels manipulation of the files can create visible banding or harsh breaks between tonal areas.
Bit level has nothing at all to do with saturation or size of the editing gamut. By way of analogy the gamut is the size of the pasture and bit level a counter of the number of cattle roaming within its borders. An 8-bit file in sRGB has the same number of discrete colors as an 8-bit file in Adobe RGB or ProPhotoRGB. The difference between them is how far apart the color values are spaced. On a practical level all you need to know is that 8-bit files produce acceptable results when editing with sRGB or AdobeRGB, but because the ProPhotoRGB gamut is so large it is necessary to also use 16-bit mode to avoid the possibility of banding in subtle tonal gradients such as sky and skin. Photoshop (.psd) and TIFF files can be 16 or 8 bit, but JPG is 8-bit only. JPG does not appear as an option when trying to save a copy of the file if it is in 16-bit mode. It is necessary to first change the file to 8-bit mode before saving as JPG.My Workflow
My editing workflow has changed over the years with my equipment. I've used Photoshop since version one in the early 1990s and still use it. When first switching to RAW files I used the Canon DPP for RAW global corrections and and Photoshop 7 for selective editing, but after upgrading to CS3 I've found the Abode Bridge - Camera RAW - Photoshop workflow more convenient. Here are the steps in my workflow:
- Capture:
- I shoot in RAW, setting custom WB using a gray card whenever possible. Custom WB does not change the actual RAW data, but the settings are used make the initial display of all files neutral, giving me a reliable, consistent baseline for making editing decisions.
- Downloading Files:
- My computer is a 24-inch iMac. I download files using a Firewire CF card reader. The Image Capture application (part of Apple OS X) is configured to open Bridge Capture when a CF card is inserted. Bridge Capture allows me to edit the name of the files and append custom meta-data with copyright information.
- Filing and Review in Bridge:
- Bridge has several different ways to view and flag photos. During the initial review I will mark files for retention and editing with 1-3 stars. Bridge then allows me to select just those files for a next level review. I eventually wind up with all the files I want to edit marked with three stars. RAW Conversion in Adobe Camera Raw: Double clicking the thumbnail image in Bridge opens the file in Adobe Camera RAW (ACR). I configure it to assign the file to ProPhotoRGB / 16-bit working (i.e editing) gamut. Global Corrections in ACR: While the file is open in ACR I evaluate the color, exposure and contrast and adjust as required. Since I do Custom WB from a gray card when shooting the color when opened is neutral, but that is just a consistent baseline starting point for evaluation. For portraits I'll often warm up the color balance a bit. A wide range of exposure, contrast, color and sharpness adjustments can be made in the ACR. CS4 added the ability to apply them using a gradient so it is possible to do things like compensate for the fall-off of flash over a group shot at this global correction stage. Batch copy Global corrections in Bridge: The changes made in ACR are not made directly to the RAW file they are stored as meta-data in either a database or "sidecar" files. One of the more powerful features of Bridge and ACR is the ability to copy and paste the adjustments made to one RAW into others. So after editing one file I can copy and paste the settings into other similar shots.
- Localized Editing in Photoshop:
- What the camera captures is rarely what
I've pre-visualized when taking the photograph because part of my
pre-visualization process takes into account what can be done in Photoshop
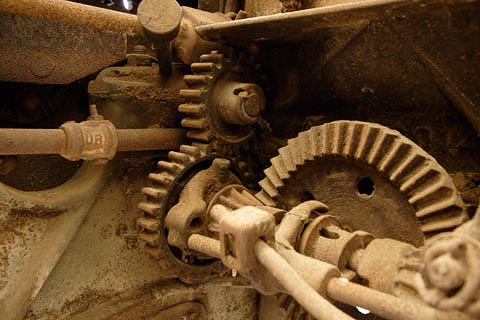
to enhance the photo. For example, when visiting a historic site in
Maryland I saw a piece of old farm equipment in a barn and was attracted
by the pattern of the gears. The lighting was very flat and uniform...
... but I knew I'd be able to enhance the contrast during Photoshop with post processing.
 Candid photos taken with flash have unavoidable fall-off of light front-to-back but that can be corrected in post-processing with the use of adjustment layers. A Levels adjustment layer is created as a placeholder for the mask needed to selectively apply the correction, then the mode of the layer is changed to screen (to lighten), multiply (to darken) or soft-light (to enhance contrast). In Photoshop repetitive tasks can be automated with scripts called "Actions" which record key strokes and mouse clicks. I created an Action which adds all three adjustment layers with a single click. The screen shot below shows the image with the adjustment layers. Note the mask icons on each layer which show where the mask was opened to apply each effect to the image.
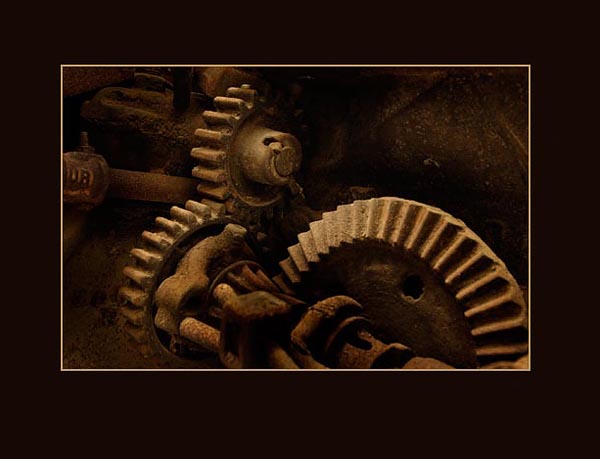 This shows the before and after comparison:
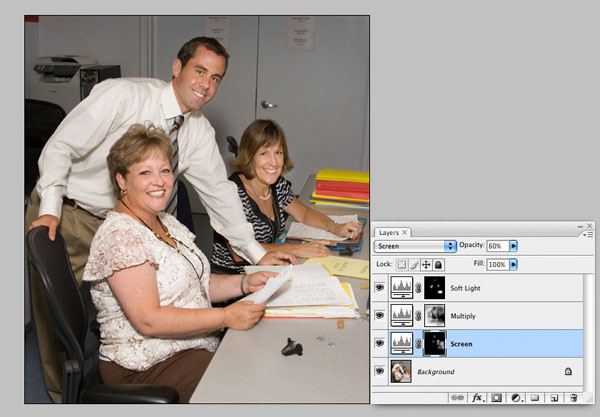 The overall effect is subtle, but that is the way any retouching and editing should be. My goal is to sub-consciously guide the viewer to the most important content of the photo with contrasting tone, sharpness, color, etc. If the retouching is consciously noticed then it is overdone. For portraits I also do subtle modification to minimize imperfections or erase a few years using selective cloning and blurring using another action I recorded which creates the adjustment layers for that process.
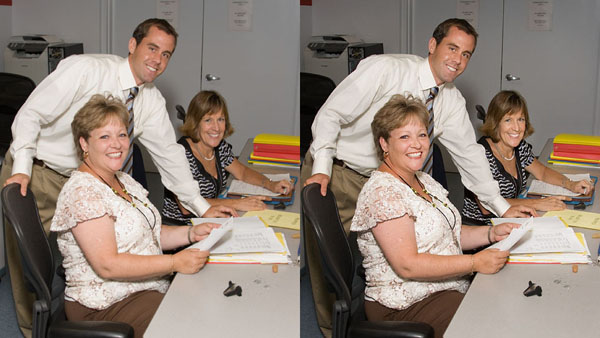
- Save Master Edit Copy:
- As you can tell from the description above I edit most files I display and print. I work on the file un-cropped and don't sharpen it because different print sizes require different crops and the need for sharpening varies with printer. So after editing I save a "Master Edit" copy of the file in Photoshop format. At that point I have two copies of the file: the RAW and the Master Edit which is still in ProPhotoRGB / 16bit format.
- Create Copies for printing and web use:
- To make a print or copy of the image for the Internet I open the Master file (if not still open) crop, then apply un-sharp masking as needed. As mentioned above the amount of USM needed varies with image content, size, output method. See my separate tutorial on USM. For prints I resize based on the resolution of the printer and the final output size. If printing 8x10, 5x7 and 4 x 6 prints of the same image I will prepare three different print files, one optimized for each size so the printer will not crop or resize them during printing. I For web images I resize based on the pixel dimensions I want on the web page and convert the colorspace to sRGB/8-bit. For many years 800 pixels by 600 pixels (VGA resolution) was a de facto limit for web images. Users today typically have larger monitors, but a 800 pixel wide page remains more readable that a wider page so on my tutorial site I still use 700px wide pages and 600px wide images. When larger images are needed I use a clickable small image to display the larger one. For an image where I've edited, printed in several sizes and resized for the Internet I will have the following copies of the file: Original RAW file + meta-data sidecar file Master Edit Copy (ProPhotoRGB/16bit - .psd format) Print File 8 x 10 (2400 x 3000 pixels - ProPhotoRGB/8-bit Level 10 JPG) Screen File (600 x 800 - sRGB/8-bit JPG)
Holistic Concepts for Lighting
and Digital Photography
This tutorial is copyrighted by © Charles E. Gardner.
It may be reproduced for personal use, and referenced by link, but please to not copy and post it to your site.
You can contact me at: Chuck Gardner
For other tutorials see the Tutorial Table of Contents