and
Digital Photography
How The Zone System Works
Adams Zone System for B&W has the technical goal of recording a full range of detail seen by eye in the B&W silver print. Contrary to what some assume the "Zones" are not f/stop differences in the scene. They are tonal values on the print in the scene which Adams defined as follows:
Zone 0 - Maximum black on print. Black voids with no detail see. Film borderZone 1 - First detail seen above black.
Zone 2 - First discernible texture.
Zone 3 - Average dark materials.
Zone 4 - Dark foliage, stone, landscape shadows and portraits in sunlight.
Zone 5 - Middle Gray 18% reflectance: north sky, gray stone, weathered wood.
Zone 6 - Average caucasian skin, shadows on snow or objects.
Zone 7 - Light gray objects, very light skin.
Zone 8 - Textured objects (i.e., white shirt / towel), highlights on caucasian skin.
Zone 9 - Smooth white objects without texture, snow in flat light.
Zone 10* - Print paper base: Specular highlights: reflections of light sources in highlights.
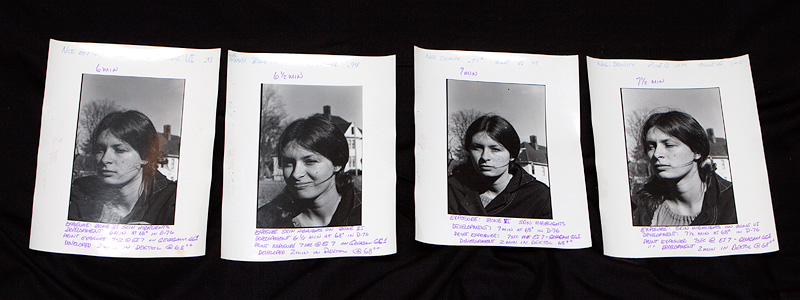
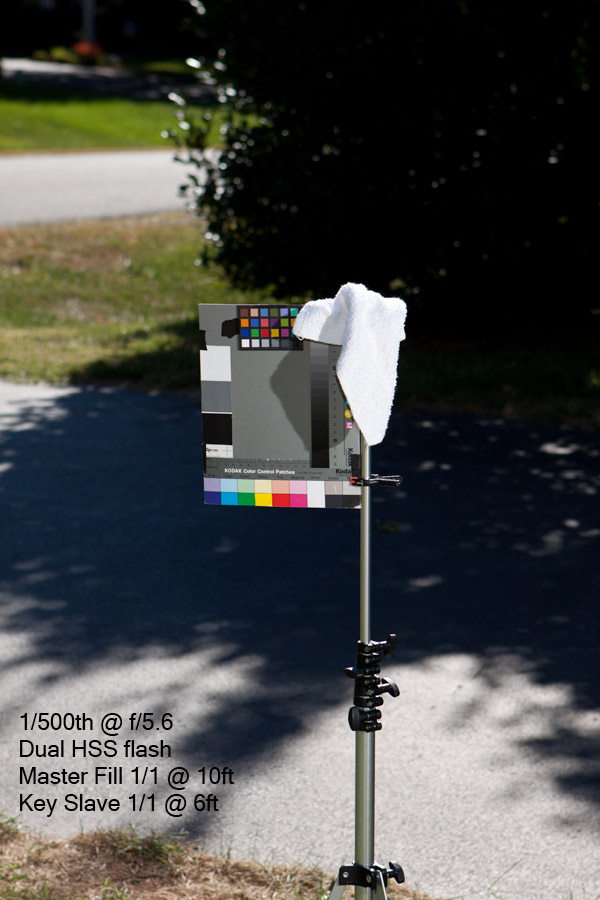
* In the 1968 edition of his Basic Photo Series (the one I used) Adams didn't assign a "Zone" number to the white paper base of the print. The "constant" in the Adams system was the #2 grade print paper. It required a negative with a density range of about 3.0 to produce a full range of tone from solid black Zone 0 to paper base white Zone 10. Each .3 difference in density is equivalent to the change in exposure an f/stop causes of the #2 paper could be said to have a "ten-stop range", but only relative to the negative, not the scene photographed — a source of confusion for many who have never actually used it. The goal of recording the full range of the scene had to be met in a very specific way in Adams system, tailoring the development of each sheet of film to have a negative density of 3.0 regardless of whether the scene was a flat overcast day measuring 7-8 f/stops from Zone 1 - 9 or a beach or snow scene in clear sunlight with a range of 12 or more. Fitting this wide range of scene ranges to the fixed 3.0 density range needed for #2 paper was accomplished on sheet film by changing development time according to scene range; increasing film development for flat lighting, decreasing it for high contrast scenes. Adams defined a "normal" scene as the range of tone you'd find in a subject in direct sun wearing light and dark clothing. The Clothing shadows in the folds of the dark clothing would fall on Zone 1 with a sunlit white shirt on Zone 9. Coincidental to the fact there where 10 "zones" this average scene would measure 10 f/stops — again a source of confusion for many who have never actually used it. To find the negative development time needed for the "normal" 10 f/stop scene to fit the #2 print time you put a subject wearing light and dark clothing in the sun and shot them on four sheets or rolls of film with identical exposure adjusted so to the Zone 1 shadow densities on the negative where above the clear base. The four identically exposed sheets/rolls of film where then developed with different times and printed #2 paper with the border exposed for max. black with the Zone 1 detail visible. The shadows on all four prints were identical; the difference in the development time was seen in the highlights: too darke if underdeveloped, blown out if over developed, and looking just like an Ansel Adams print when the fit was just right. Below are the test prints from my Zone System calibration test back in 1971 when I first taught myself the Zone System from Adams' books.
The Zones = f/stop confusion stems from the fact Adams' baseline "normal" sunlit scene measures 10 f/stops and his baseline #2 print paper needed a 3.0 density range (i.e. 10 stop equivalent) negative range. Every scene and every full-range print had 10 - zones but the original scene might have 8 on an overcast day and 12 if covered in snow on a clear sunny day.
Metering for the Zone System and the 18% Gray Card
Spot meters didn't exist when Adams devised the system. Exposure was based on a averaging reflective reading meter taken off the 18% gray card (or the palm of a hand) then associated visually with Zone 5 content in the scene. But for a sunlit scene the "Sunny 16" rule of thumb was just as accurate and simpler.

The hand held 1-degree spot meters available when I learned to use the Zone System made determination of scene range more precise. I'd simply aim my Honeywell 1° spot meter at the Zone 1 shadow where I wanted to preserve detail, then on Zone 9 highlight were I wanted detail above the paper base specular highlights and know the f/stop range exactly and know from my testing what development time was needed for those lighting conditions. Since most of my shooting was done outdoors on clear sunny days more often than not the scene measured 10 stops (i.e. normal scene) and I used the baseline normal development time determined with the test prints above.
The Zone System compared to shooting digital today was like a Japanese Tea Ceremony vs. sticking a tea bag in a cup and putting it in the Microwave. Even in the age of film it was not very practical with a roll film camera because while shooting a roll of film a photographer might encounter scenes with 8,9,10 or more f/stop range making it impossible to tailor development to each scene range. I used a pair of Nikon F cameras at the time and loaded my own 10 exposure cartridges using a bulk loader and 100 foot rolls of Tri-X.
What most B&W shooter would do is develop all film as if all the scenes were in fact baseline "normal" with 10 stops, then use print papers with different contrast ranges to fit the print to the range of negatives with more density (> 10 stop scenes) or less density (< 10 stop scenes). Kodak made that even simpler by introducing a "PolyContrast" paper that changed contrast when magenta or yellow filters were used in the enlarger. When a scene was low in contrast and the resulting negative lighter than normal a yellow filter would be used to fit paper range to it. When the scene contrast was high magenta filtration would fit the denser negative to the paper to create a full range print.
But even with roll film parts of the Zone System were valuable. If a photographer took the time to spot meter the scene and determine the its range, then took notes, he'd know in advance what paper grade or filter to use when printing the negatives. Adams concept of using the #2 print as a constant could also be used when making contact sheets from the negatives.
How is Digital Different?
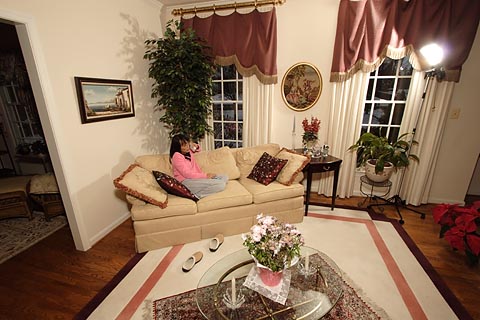
Digital cameras, like the #2 print paper, have a fixed range which can't be altered. The range is much shorter than B&W. Whereas a B&W negative could be adjusted by development to handle an 8 - 12 stop scene ranges a digital camera sensor can only record 6 - 7 f/stops of the scene range with detail. That's why exposure, particularly automatic meter controlled exposure, is so difficult with digital. If a "normal" 10-stop scene is recorded with a digital camera with exposure adjusted to maintain highlight detail this is the result in back lighting:
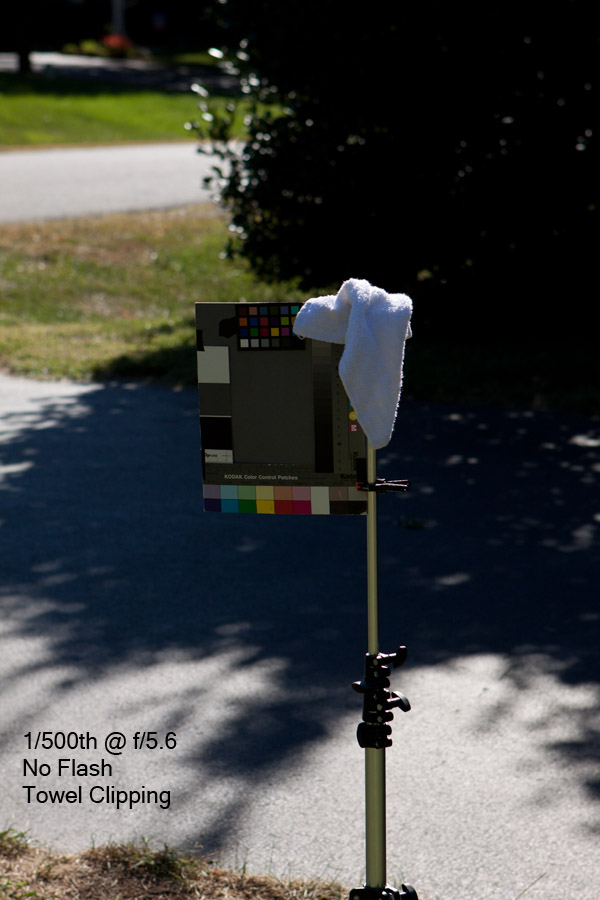
Technically that shot has "correct" or more precisely "optimal" exposure for the highlights but the sensor can't handle the contrast of the lighting. So its is a "perceptual" fail because background and foreground both look under exposed compared to how the my eyes adapted and perceived it in person.
Exposure is a relative thing. I could have instead opted to expose "perceptually" to make the background and foreground look "normal" in the midtones reproduce the 18% card exactly on Adams' Zone V so its image on the print also reflects 18% of the light. That would normalize the scene overall because, but blow the sunny highlights by two or more stops.
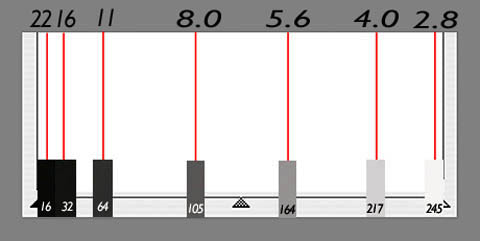
Spot metering and determining scene range wouldn't help matters because: 1) I can't change the sensor range, and; 2) Canon doesn't tell me what it is. The fact that the digital camera can't correctly expose both ends of an outdoor scene is something they would rather consumers not know. It is possible to determine sensor range with a simple test using a gray card. Open a fast lens to its widest aperture and adjust shutter until the card is 1/3 under clipping (a "Zone 9" 250 eyedropper value) then close the lens one stop at a time until the card is rendered as black (Zone 1 or 0). The number of stops it takes to change the card from Zone 9 white (250) to Zone 1 black (20) is the effective range of the sensor.
Using Camera Feedback - Histogram and Clipping Warning
With a digital camera it is not necessary to use a spot meter to determine when a scene exceeds the sensor. Just expose the brightest highlights below clipping guided by the playback clipping warning then look at the left side of the histogram.
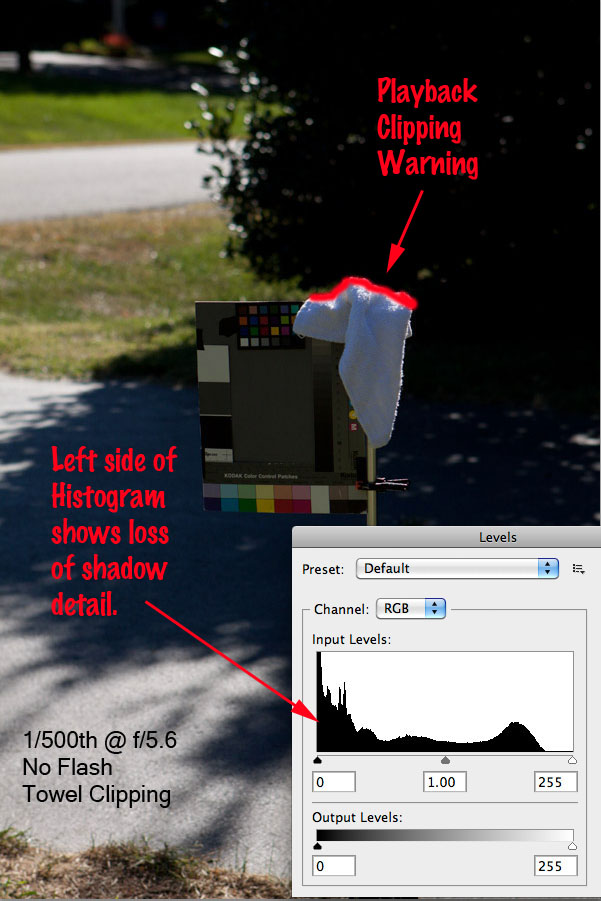
The camera histogram and clipping warning are based on the JPG the camera creates for the playback. In shots where the highlights are a small percentage of total frame content as above the histogram is useless for detecting clipping. The better tool for determining highlight clipping and optimum exposure just under clipping is the clipping warning. The camera playback
will typically show a bit more clipping than is occurring on the RAW file, but I find basing exposure on the playback clipping provides a "safety" margin. It is better to err on the side of slight underexposure vs. blowing highlights.
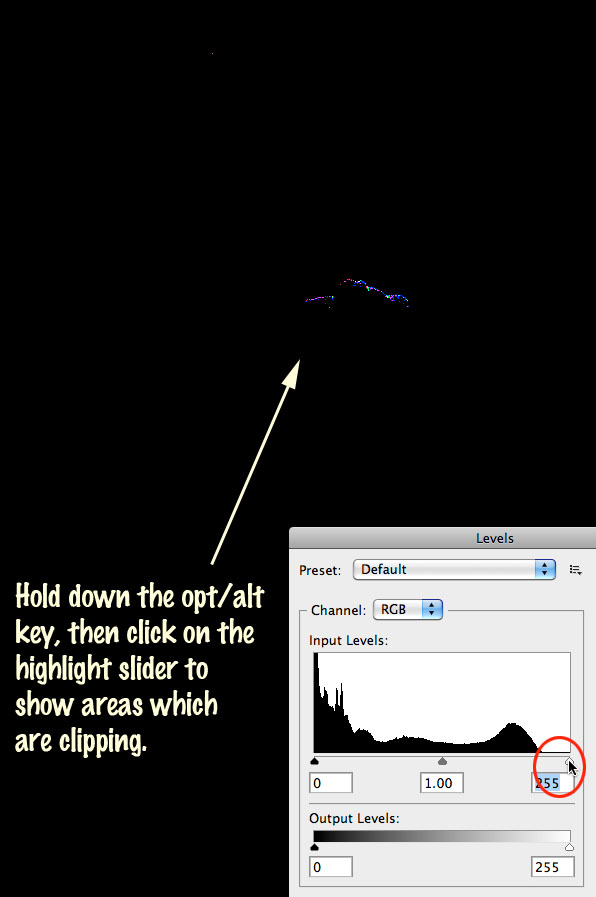
Adobe Camera RAW has warnings which will show when highlights or shadows are clipping and losing detail. There is also way to show clipping by channel in Photoshop. Open an image using Levels, then hold down the alt (PC) or opt (Mac) key while clicking the highlight adjustment slider. Doing that using the image above reveals very little is clipping in the highlights:
If you have been considering buying a $500 L-758 spot meter
you'd be wiser to use the money to buy a powerful flash instead.
We Can't Change the Sensor Range But We Can Change the Scene Range
The problem of outdoor lighting exceeding capture range is not new or unique to digital. Photographers got the same rude wake-up call when transitioning from B&W to color negative which has a range similar to digital and again when using transparency film which has an even shorter range. Faced with a backlit subject like the one above a photographer would typically decide to expose for the shaded foreground even though it meant blowing out the highlights and the sky several stops. Photos with nuclear halos around heads and blown highlights became the new "normal" for color photography.
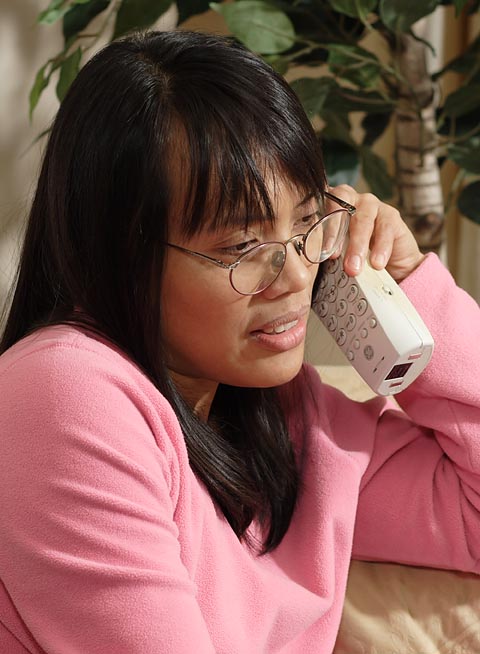
Photographers had long used flash indoors with B&W due to low light levels and slow film, but it hadn't been necessary outdoors where there was usually lots of light and few problems handling the contrast of a sunny day. But judging from results I see in photos of others very few photographer today understand how to use flash outdoors effectively, in part because they don't understand what makes lighting look natural. The direction of natural light north of the equator, both the direct sunlight and the indirect skylight, is a function of how the sun travels in an arc from E-SE-S-SW-W. Except for early in the morning and late in the afternoon outdoor light comes from an overhead angle of 45-60 degrees. For that reason natural looking lighting is downward angled lighting. What makes flash look unnatural is when it hits at an unnaturally low angle. Where do camera manufacturers put the built-in flash and hotshoe attachment? Nearly level with the lens, unnaturally low. Outdoors when a subject is backlight — which is the most effective way to deal with the contrast using flash — the skylight on the front of a face has downward direction which creates 3D modeling. What happens when low shadowless fill flash is added to deal with the contrast is that it overpowers and cancels out most or all of the natural modeling:


When To Use a Second Flash Outdoors
The answer to the question of when to add a second flash outdoors is the same as indoors: it is always a good idea if full control over lighting pattern and ratio is desired.
The 6-7 stop range of the camera sensor has as much difficulty dealing with a single flash indoors as with the sun outdoors when it is moved off the cameras sideways. Whenever a flash creates shadows it needs fill from somewhere to lighten the shadow. Indoors the fill, to the extent there is any comes mostly from spill from the flash bouncing around the room. Cap style diffusers increase the amount of "spill fill" the flash creates producing light shadows. Photographers think shadows get softer when large modifiers are used because the light is wrapped, but to the extent the light is making the shadow on the tall nose and side of the face opposite the off-camera flash lighter is due to the fact as the footprint of a source increase so does the amount of the spill it creates. Outdoors there is no ceiling to bounce the spill. There is skylight fill, but as the ambient only shots exposed for the highlights illustrate its not enough to create the amount of fill need to match what is perceive as natural by eye. In backlight the eyes will constantly shift exposure as they focus separately on the foreground and background. When looking at the shaded foreground the background will "blow out" by eye just as with the camera but the brain will tune it out and insert the memory of seeing the background correctly exposed. Your impression isn't what your eyes see, its what the brain combines from all the places the eyes have scanned and adapted.
When Flash Won't Work Use Flat Sunlight
There are many situations where it is not possible to use flash or where a normal as possible background is needed, such as for a landscape or outdoor sports. Since there is no way around the limited range of the sensor the only viable strategy to eliminate loss of detail is to keep the it out of shadows by using light which doesn't create any. Sunlight is never perfectly flat because it comes from overhead, and that will create problems like shaded eye sockets, so at best it is a compromise between being able to see the face at all vs. seeing it in the most flattering light. But whereas it is not possible to pose a portrait subject looking up towards the sun a athlete catching a ball will need to look up putting light in the eyes. A high vantage point looking down with sun behind matching the angle of the sun will make the light more shadowless to the camera.
When It Doesn't Move use HDR
HDR or High Dynamic Range solves the sensor range problem by blending bracketed exposures shot from a tripod. They are an obvious choice for architecture, landscapes and any still life subject. It's really not necessary to take 6 different bracketed exposures. Two will usually suffice: one with the highlights below clipping and a second with 3-4 stops longer shutter time to capture the darkest shadows well above the noise threshold of the sensor.
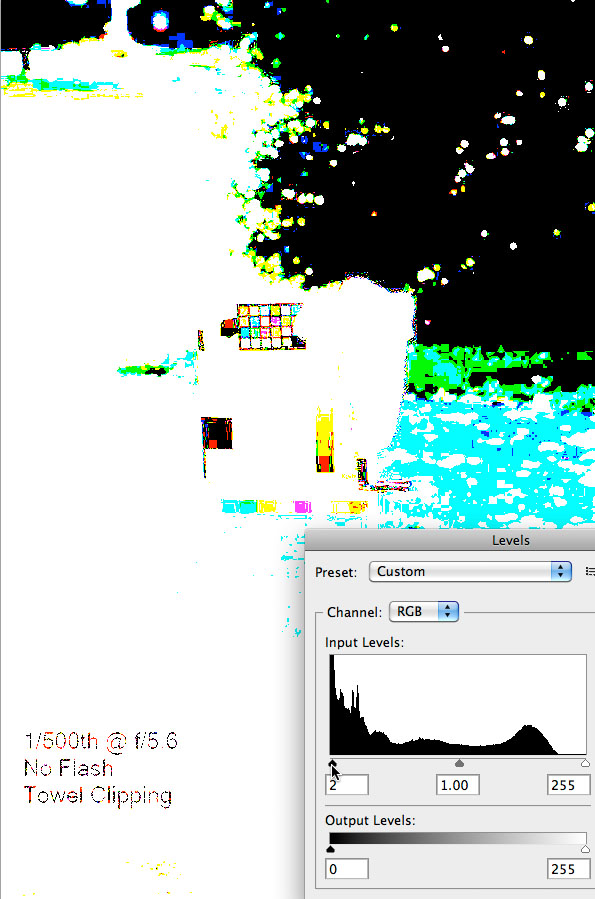
When All Else Fails, Fake It with Photoshop
Photoshop can't put detail in shadows beyond what the camera captures but it can lighten the shadow detail that is there but not easily seen in the out of camera rendering. The brain equates tone with detail in a photograph. Solid black is perceived as a void. Any thing lighter will seem by comparison to have detail. For example here is the JPG of the baseline ambient only shot above adjusted in Levels to try pull more detail out of the midtones. The extreme ends near white and black remain the same.

Indoor Lighting With Flash
Meeting the goal of recording a full range of tone requires strategies which reduce the contrast of the scene lighting by: 1) eliminating shadows, and; 2) making the shadows lighter by filling them. Lighting indoors usually has less contrast that outdoors in direct sunlight and the intensity of the ambient light is so low in most cases that it can be effectively removed from the exposure by increasing shutter speed. Shutter speed does not affect the flash exposure because the flash duration is much shorter.
Eliminating Shadows The reason build-in and hot shoe flash is located near the lens axis is to minimize shadows. As with direct sun if a bright flash is hitting an object with no fill it will cast a shadow which exceeds the ability of the sensor to record detail in highlights and shadows at the same time. But in perfectly flat shadowless lighting the sensor can record most of the tonal range because everything is highlighted and there are few visible shadows. But correct exposure over the full range of tone isn't the only goal in a photograph. The more important goal is making the content of the photograph look real and 3D and the clues needed to do that naturally are produced by raising the light source overhead.


Why Dual Flash is a Better Solution Than Bouncing
Bouncing a single flash to create spill fill and reduce overall contrast to the range the sensor can handle can be a very effective lighting strategy but it is seldom the most efficient or the predictable. There is little effective control over the direction of the light or the lighting ratio. The dominant direction of the the light still comes from direction of the camera so there will be very little in the way of 3D modeling unless the light is bounced off a side wall. All things considered I would rather have a flash on a bracket because the results with direct flash are more efficient, concentrating all the flash output on what is in the photo, and more predictable.
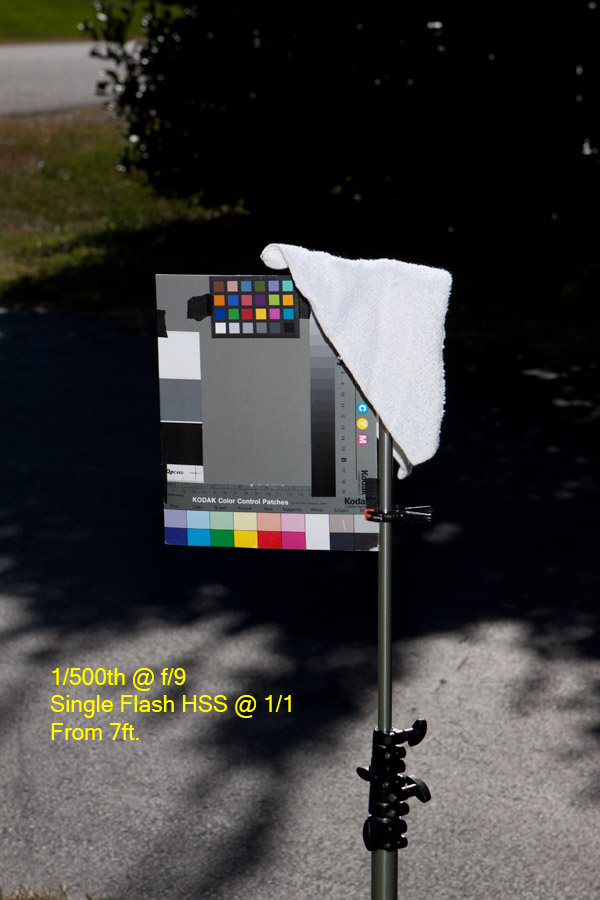
Adding a second flash off camera while keeping the other near the lens axis directly over the camera allows sideways placement for better 3D modeling with more efficient direct aiming of the light, without the problem of the off axis "key" light creating dark unfilled shadows. The filling of the shadows is addressed by the flash on camera or bracket. Fill lifts everything it hits evenly. Unlike single flash where the power must be set to expose the highlights correctly the fill flash power is set based on lifting the darkest Zone 1 shadow content to the point the sensor can record it as Zone 1. The off camera flash overlapping the fill is then raised until the brightest white objects it hits are raised from about Zone V in the fill alone, to Zone 9 - white with detail. A wireless semi-automatic flash system like Canon's E-TTLII system make using dual flash as simple as using one. Set the desired ratio (A:B = 1:2 will fit range to most sensors), move the off camera flash until its 45° from the nose of the subject (the face will be seen obliquely from behind the light)...

Where in the B&W Zone System we would expose the ambient for the shadows and develop for the highlights, with digital and flash indoors we must used fill flash for the Zone 1 shadows and create the Zone 9 highlights by overlapping the off-axis "key" light over the foundation of nearly flat fill.
A Digital Camera with two flashes can control the foreground tonal range it the same way as B&W a film camera using the Zone System !
This is hardly breaking news. Back in 1972 when I went to work as Monte Zucker's assistant he handed me a camera with a flash on a bracket over the lens and a stand with an identical flash on it. Wedding photographers had struggled with the contrast of a white bride's dress next to a groom's black suit when switching from shooting B&W to shorter range color film. Zucker was one of the first wedding shooters to realize that using two flashes in a key over flat fill configuration was the solution. Zucker did with flash and color film what Adams did with B&W — fit the entire range of the scene to the print.
Indoor vs. Outdoor Lighting With Dual Flash
The only difference between using dual flash outdoors vs. indoors is that outdoors the sun as backlight adds the natural equivalent of the third "hair light" flash added for separation with studio portraits.
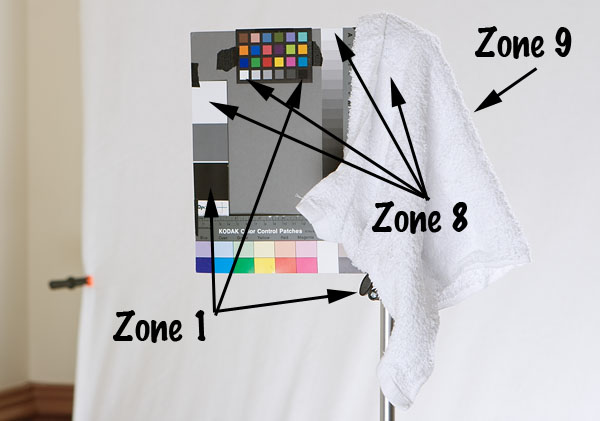
In a two flash lighting scenario the Zone 1 shadows on the front of the subject would be exposed via the fill light intensity to render as Zone 1 in the digital image, then key light would be raised until highlights on the front of a white object were Zone 9, just below clipping in the camera warning and falling around 250 on the 0-255 eyedropper scale. When a third hair light is added to a indoor lighting scenario the Zone assignments in the highlights in front must change from Zone 9 to Zone 8 with the Zone 9 value assigned to the rim lit highlights..
Summary:
The Adams Zone System created a new vocabulary for pre-visualizing the tones of a scene and translating those same values in the reproduction via systematic control of exposure and development of B&W film. A goal of the photographic process is capturing a full range of tone, a basic requirement for making a photograph seem real. The process works on a technical level because B&W film can be adjusted by development to match the contrast of any outdoor scene to the fixed range of the B&W print paper.
Unlike B&W a digital camera cannot record the full range of an outdoor scene with ambient light alone. An average outdoor scene measures about 10 stops but the camera can only record about 7. That requires decisions on the part of the photographer regarding what part of the scene range to expose inaccurately. Adding flash can overcome the limitation of sensor range to record a full range of tone, but only if two flashes are used in even fill / overlapping key light configuration, and only in the foreground illuminated by the flash. Depending on the range of the sensor it may also be possible to render a full range with either flat shadowless natural light, or flat shadowless flash. What bounce and single flash cap modifiers actually do is make the lighting flatter and more shadowless (i.e. lighter shadows via spill fill) resulting in a net reduction in contrast and a better fit to sensor range. While effective in rooms were the light can bounce to scatter and change direction to hit the front of the subject they are less efficient and afford very little control over direction and ratio (i.e. fitting scene to sensor). Dual flash is better in all respects, with the exception of convenience. When dual flash is used outdoors the only difference vs. indoors with flash is the Zone placement of the highlights. Indoors without backlighting the brightest highlights in front would be exposed for Zone 9 white. Outdoors in back light the sunlit parts are exposed for Zone 9 (if detail is desired) which requires the highlights on the front lit with the flash to be darker around Zone 8 instead of 9 to preserve the ambience of the backlighting. That's a just a more precise definition of the conventional wisdom to set the flash about 1 stop lower than ambient. There are many post processing tricks to overcome the limits of the digital sensor, but the most effective strategy is to always try to record the full range of tone in the scene from the Zone 1 shadows to the Zone 9 highlight you see by eye. Learning to use the direction of the ambient light and flash to change contrast are both parts of the solution and there is no "one size fits all" solution to every lighting situation. But the more tools you have (i.e. two flashes vs. one or none and a sturdy tripod) and the more techniques using them you master (i.e. no flash, single flash, dual flash, HDR) the better you will be able to tackle the next problem you haven't encountered before.Holistic Concepts for Lighting
and Digital Photography
This tutorial is copyrighted by © Charles E. Gardner.
It may be reproduced for personal use, and referenced by link, but please to not copy and post it to your site.
You can contact me at: Chuck Gardner
For other tutorials see the Tutorial Table of Contents